Most of the time I tend to client needs — integration, search functionality, complex business logic. But this time I needed a simple website for myself.
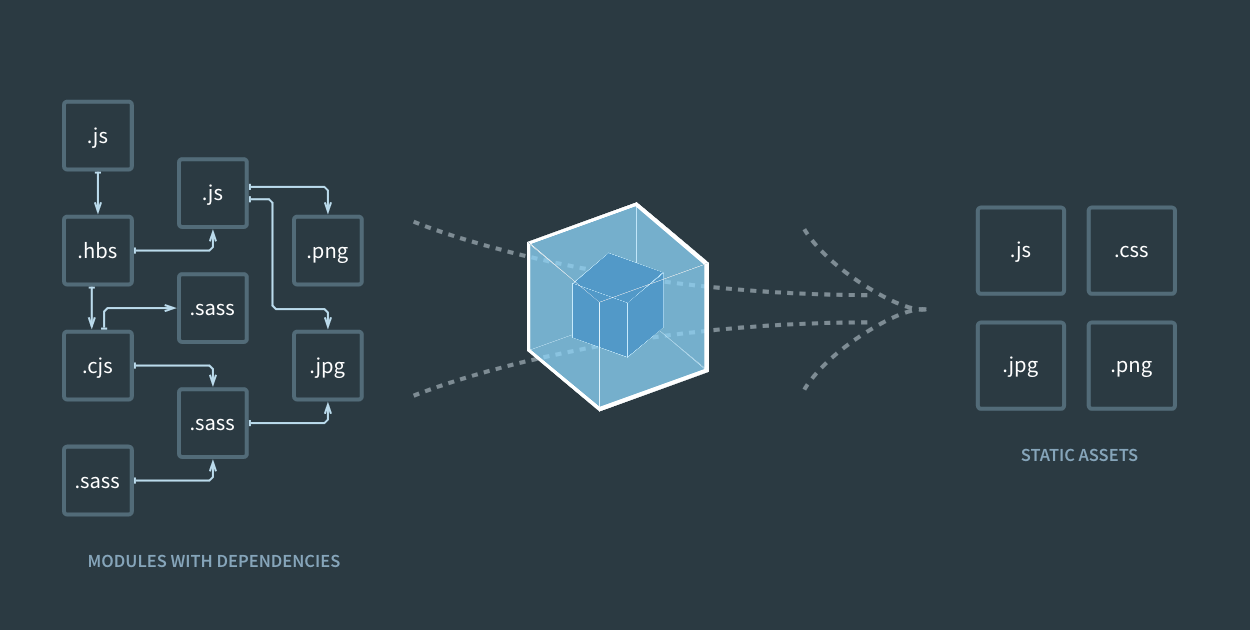
Writing html with a bit of css and javascript is not that hard, but making sure assets are not aggressively cached, styles are understood in older browsers and scripts using newer language features get transpiled is another issue. It is possible to write additional scripts dealing with aforementioned issues, but those problems are already solved in developer community. There are bunch of task runners a developer could use: Grunt, Gulp, Browserify, Parcel, Rollup, Webpack or even Ant and Gradle.
Here I’m not going to compare provided options but rather use what I have experience with.
Reference implementation (example) of what I talk about is in the following repository: ivarprudnikov/webpack-static-html-pages
Note: Babel updated to v7 on 2019-01-17. You could check out reference implementation with v6 by looking into git history.
Requirements at hand
- Multiple
htmlpages (no SPA) - Minify and cache bust
cssandjsfiles in production - Usage of NPM modules
- Development server
Choosing task runner/bundler
I used to do Grunt, Gulp, Browserify, but lately switched to Webpack — preferred choice alongside React development. There was no hesitation in being consistent with what I use most often, so to fulfill above requirements I tried Webpack. Did not believe at first it will be possible or viable as usually it would be used for a single page app having just one html page.
Development server
To start development of an app you could choose one of Webpack’s starter kits provided by developers in the community, but when you have so many choices (not limited to above link) it is hard to make up your mind. It is necessary to know the API to allow oneself evaluating starter kit properly, or just try one by one. Because my goal was to make plain html pages without any use of React or Vue.js or Angular or else, I looked for lightest setup. There was one that caught my eye:
lifenautjoe/webpack-starter-basic
Otherwise if you would start from scratch you could make it lighter by writing config yourself.
$ mkdir -p MyProject/src && cd MyProject
$ npm init
$ npm i -D webpack webpack-cli webpack-dev-server html-webpack-plugin
$ touch src/index.html src/index.js
With above commands we start setting up our project. I used npm init to bootstrap package.json then npm i -D to install dependencies and touch to create first files. Next let’s put something in index.html but leave index.js empty:
<!DOCTYPE html>
<html>
<head>
  <title>My homepage</title>
  <meta charset="UTF-8">
  <meta http-equiv="cache-control" content="no-cache"/>
  <meta http-equiv="pragma" content="no-cache"/>
  <meta http-equiv="content-type" content="text/html; charset=UTF-8">
  <meta name="viewport"
        content="width=device-width,user-scalable=0,initial-scale=1.0,minimum-scale=1.0,maximum-scale=1.0">
</head>
  <h1 class="page-title">HOMEPAGE</h1>
</body>
</html>
Now to serve it we need some basic Webpack config webpack.dev.js:
$ touch webpack.dev.js
Above will create our config file. Paste following inside it:
const HtmlWebpackPlugin = require('html-webpack-plugin');

module.exports = {

  // https://webpack.js.org/concepts/entry-points/#multi-page-application
  entry: {
    index: './src/index.js'
  },

  // https://webpack.js.org/configuration/dev-server/
  devServer: {
    port: 8080
  },

  // https://webpack.js.org/concepts/plugins/
  plugins: [
    new HtmlWebpackPlugin({
      template: './src/index.html',
      inject: true,
      chunks: ['index'],
      filename: 'index.html'
    })
  ]
};
At this moment you can start development server and inspect results in the browser http://localhost:8080:
./node_modules/webpack-dev-server/bin/webpack-dev-server.js --config webpack.dev.js --mode development
You will see previously created index.html with injected index.js in it. This is the magic of HtmlWebpackPlugin achieved by creating entry point and then referencing it in its plugin config with inject: true and chunks: [‘index’] .
Pro tip: to simplify above command just put it into package.json under scripts then you will be able to just npm start from command line:
{
  "name": "myproject",
  "version": "1.0.0",
  "description": "",
  "scripts": {
    "start": "webpack-dev-server --config webpack.dev.js --mode development"
  },
  "author": "",
  "license": "ISC",
  "devDependencies": {
    "html-webpack-plugin": "^3.2.0",
    "webpack": "^4.28.4",
    "webpack-cli": "^3.2.1",
    "webpack-dev-server": "^3.1.14"
  }
}
More HTML pages
Let’s add more basic html pages like about.html and contacts.html, next to current index.html I will deal with CSS later. Now update Webpack config to serve those pages:
const HtmlWebpackPlugin = require('html-webpack-plugin');

module.exports = {

  // ...

  plugins: [
    new HtmlWebpackPlugin({
        template: './src/index.html',
        inject: true,
        chunks: ['index'],
        filename: 'index.html'
    }),
    new HtmlWebpackPlugin({
        template: './src/about.html',
        inject: true,
        chunks: ['index'],
        filename: 'about.html'
    }),
    new HtmlWebpackPlugin({
        template: './src/contacts.html',
        inject: true,
        chunks: ['index'],
        filename: 'contacts.html'
    })
  ]
};
Above we are reusing index.js file in every page with chunks: [‘index’] to change this just add new Javascript files about.js contacts.js then use those in entry configuration and reference it in HtmlWebpackPlugin configuration options:
//...
entry: {
    index: './src/index.js',
    about: './src/about.js',
    contacts: './src/contacts.js'
},
//...
plugins: [
  new HtmlWebpackPlugin({
      template: './src/about.html',
      inject: true,
      chunks: ['about'],
      filename: 'about.html'
  }),
  new HtmlWebpackPlugin({
      template: './src/contacts.html',
      inject: true,
      chunks: ['contacts'],
      filename: 'contacts.html'
  }),
  // ...
]
//...
Pro tip: develop naming convention for your html and js files and configure them all at once by loading them via fs in webpack.dev.js.
Adding CSS
This might seem counter intuitive but those Javascript files created previously will serve as a proxy to get to css. First get the normalize.css :
$ npm i -S normalize.css
Now require it in Javascript files previously created, add following import to top of the file:
require('normalize.css/normalize.css');
Above will fail if you start development server. Webpack does not know yet what to do with that file. To fix it just a new rule in webpack.dev.js and install specific modules that deal with css:
$ npm i -D css-loader style-loader
Then add the rule:
module.exports = {
  // ...
  // https://webpack.js.org/concepts/loaders/
  module: {
    rules: [
      {
        test: /\.css$/,
        use: [
          "style-loader",
          "css-loader"
        ]
      }
    ]
  },
  // ...
}
Now after npm start you’ll see link to css stylesheet injected in the head element of an html file. To add more stylesheets just require() them in Javascript file.
Pro tip: use Sass instead of plain css by adding one more loader https://github.com/webpack-contrib/style-loader
Use latest Javascript language features
Make sure we have Javascript file with very new features, like class and static methods. Below example is our index.js and it should print 1234 in the console when page loads.
require('normalize.css/normalize.css');

class Foo {
    constructor(){
        this.value = "foobar"
    }
    static instance() {
        return new Foo()
    }
    getValue() {
        return this.value
    }
}

console.log(Foo.instance().getValue())
To make above work among browsers it needs to be transpiled/compiled/desugared into simpler form of Javascript. And again to do that we need to install new modules that will help us:
$ npm i -D @babel/core babel-loader @babel/preset-env
Then define a new rule for Javascript files in webpack.dev.js:
// ...
module: {
    rules: [
        {
            test: /\.js$/,
            exclude: /node_modules/,
            loader: 'babel-loader',
            options: {
                presets: ['@babel/preset-env']
            }
        },
        // ...
    ]
},
// ...
After restarting server and inspecting modified index.js file it will show simplified Javascript similar to:
// ...
var Foo = function () {
    function Foo() {
      _classCallCheck(this, Foo);
      this.value = "foobar";
    }

    _createClass(Foo, [{
        key: "getValue",
        value: function getValue() {
            return this.value;
        }
    }], [{
        key: "instance",
        value: function instance() {
            return new Foo();
        }
    }]);

    return Foo;
}();

console.log(Foo.instance().getValue());
Assembling production release
At this time we have a project which can be run locally, but in order for it to be deployed to remote server couple of things need to happen:
- minify
css,jsfiles, because bytes matter; - add a hash to the names of minified files, this way we can configure server to serve those with appropriate cache headers with confidence that new versions will still be fetched by browser;
- make sure correct filenames are used in
html; - store generated files in a configured location;
It is possible to use existing webpack.dev.js and have conditionals inside that differentiate between production and development environments to execute tasks mentioned above, but then it gets a bit complicated and harder to read, for this reason new webpack.prod.js configuration file will be setup. But first lets get more dependencies to help us with minification, optimization:
npm i -D clean-webpack-plugin mini-css-extract-plugin optimize-css-assets-webpack-plugin terser-webpack-plugin http-server
Now we can safely write configuration, looks similar to webpack.dev.js:
const path = require('path');
const { CleanWebpackPlugin } = require('clean-webpack-plugin');
const HtmlWebpackPlugin = require('html-webpack-plugin');
const MiniCssExtractPlugin = require("mini-css-extract-plugin");
const OptimizeCssAssetsPlugin = require('optimize-css-assets-webpack-plugin');
const TerserPlugin = require('terser-webpack-plugin')
const buildPath = path.resolve(__dirname, 'dist');

module.exports = {

    // This option controls if and how source maps are generated.
    // https://webpack.js.org/configuration/devtool/
    devtool: 'source-map',

    // https://webpack.js.org/concepts/entry-points/#multi-page-application
    entry: {
        index: './src/index.js',
        about: './src/about.js',
        contacts: './src/contacts.js'
    },

    // how to write the compiled files to disk
    // https://webpack.js.org/concepts/output/
    output: {
        filename: '[name].[hash:20].js',
        path: buildPath
    },

    // https://webpack.js.org/concepts/loaders/
    module: {
        rules: [
            {
                test: /\.js$/,
                exclude: /node_modules/,
                loader: 'babel-loader',
                options: {
                    presets: ['@babel/preset-env']
                }
            },
            {
                test: /\.css$/,
                use: [
                    MiniCssExtractPlugin.loader,
                    "css-loader"
                ]
            }
        ]
    },

    // https://webpack.js.org/concepts/plugins/
    plugins: [
        new CleanWebpackPlugin(buildPath),
        new HtmlWebpackPlugin({
            template: './src/index.html',
            inject: 'body',
            chunks: ['index'],
            filename: 'index.html'
        }),
        new HtmlWebpackPlugin({
            template: './src/about.html',
            inject: 'body',
            chunks: ['about'],
            filename: 'about.html'
        }),
        new HtmlWebpackPlugin({
            template: './src/contacts.html',
            inject: 'body',
            chunks: ['contacts'],
            filename: 'contacts.html'
        }),
        new MiniCssExtractPlugin({
            filename: "[name].[contenthash].css",
            chunkFilename: "[id].[contenthash].css"
        })
    ],

    // https://webpack.js.org/configuration/optimization/
    optimization: {
        minimize: true,
        minimizer: [
            new TerserPlugin({
                cache: true,
                parallel: true,
                sourceMap: true
            }),
            new OptimizeCssAssetsPlugin({})
        ]
    }
};
Last step is to add handy commands to package.json to build and preview production assets in action:
"scripts": {
  "start": "webpack-dev-server --config webpack.dev.js --mode development",
  "build": "webpack --config webpack.prod.js --mode production",
  "preview": "npm run build && http-server dist"
},
To build and preview website locally run:
$ npm run preview
Source code
Check out repository with above example, a better example to be frank, including image loader, links between pages and functional tests. ivarprudnikov/webpack-static-html-pages