
May 2019. In a need of Github access token to interact with their API. Adding “Login with GitHub” button should not require deployment of your own serverside app. Sigh.
Background story
As it happens a tiny fraction of my development time is spent filling in timesheets describing what I do. It helps with budgeting, invoicing, development focus. Despite its usefulness it is quite easy to forget to add an entry just before you head home, the same happens again and again. Sometimes it all accumulates and suddenly someone has to fill in lengthy time gaps.
Almost all of that work is done with using Git and as it happens most of it is in GitHub. One obvious way is to look into commit activity and extract all projects for which I made commits in a given time frame which in turn allows me to fill in
those time gaps. AFAIK there is no easy way to do it. For the very reason I wrote a bash script that goes through
all relevant repositories, checks them out and filters out git log to include commits made by me. It helps but it takes some time before all relevant repositories are cloned, it is also not very user friendly and hard to extend and maintain. What is more the authentication requires me to look up GitHub Personal access token every time I want to use the script, just because I cannot memorize it and it would be naive to store something powerful just for the sake of this script.
Light Bulb moment
Why am I bothering myself with this bash script when I could write a simple website which will have “Login with GitHub” to obtain the token and then use it against GitHub API. This would allow to make meaningful UI and might even help some Joe Bloggs who suffers from the same lack of discipline as I do.
Website hosting is dead cheap these days, one could even say it is almost free. But GitHub OAuth usage requires deployment of a server side application which increases costs compared to just having a static website somewhere on AWS S3.
An alternative to a full scale server-side application might be usage of Serverless architecture where units of work are split and then being run on demand, it is also touted to be cheaper due to the fact that customer is not charged for idle compute time. In other words - no website visitors, no payment necessary.
GitHub OAuth flow
To build something like “Login with GitHub” button developers need to tweak some knobs and dials on GitHub itself. It is necessary to create an OAuth app to begin with, which will in turn provide client_id and client_secret that are necessary in authentication flow. Application name, icon and redirect url should be configured as well; name and icon will be visible by users who will try authenticating.
Adding your static website into this flow makes things a bit more complicated.
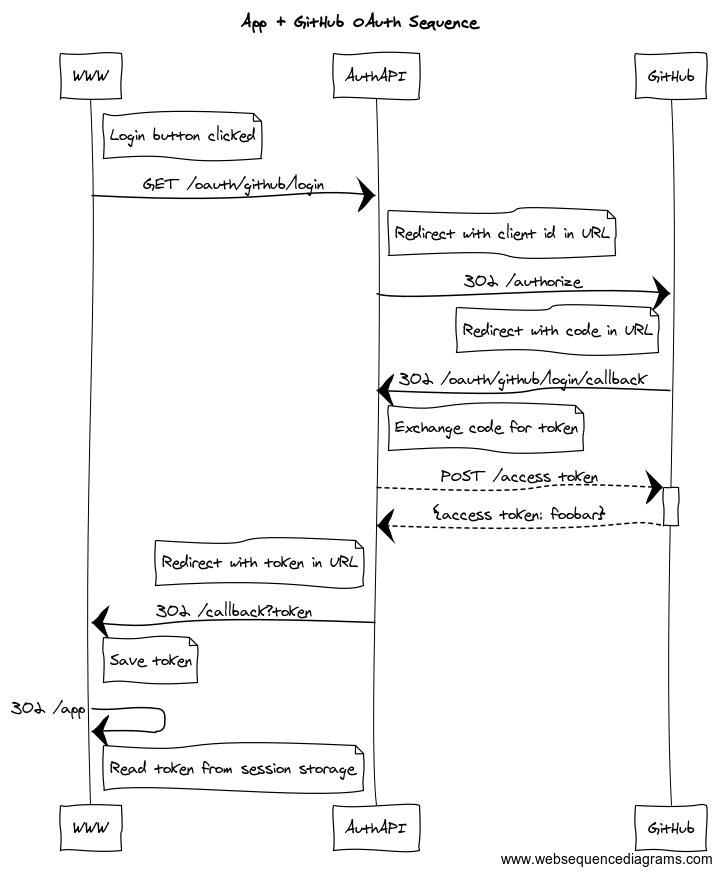
Sequence in words
- User clicks a login button on your site WWW
- Browser opens new url which points to your AuthAPI server
- AuthAPI server issues a redirect to GitHub
authorizeendpoint passingclient_idas a query parameter in the URL - GitHub issues a redirect to endpoint configured in OAuth app settings which in this example lives under AuthAPI, url contains authorization code
- AuthAPI server exchanges code received in URL for access token using POST request to GitHub. Response from GitHub will have
access_token. - AuthAPI issues redirect back to site WWW, to a special html page containing logic which is able to extract
access_tokenfrom URL access_tokenis saved in session storage- Another redirect is issued to a location that needs this token within your site.
Above sequence ignores some details around what parameters are passed in some requests. You can read about those in GitHub developer documentation “Authorizing OAuth Apps”.
It is also worth mentioning that this flow should be further improved by making sure website sends some unguessable token which would be used in subsequent OAuth requests as state parameter, this way we could increase integrity and security of the whole flow. More about state parameter in RFC6749.
Splitting flow into lambdas
You have probably heard about Lambdas and the way code can be executed on demand. Surely just having Lambda is not enough as we need a proper API endpoint for it to work, then you ought to use ApiGateway on top of it. Now ApiGateway allows you to specify your custom domain which will probably make you use CloudFront to make it edge optimised and also provide a way to use your certificate generated in AWS Certificate Manager. Finally you will be able to reference that CloudFront optimised API in one of your Route53 hosted zone entries. All of the above is surely done in a declarative way using CloudFormation, or a wrapper around it called SAM(Serverless Application Model).
If you have to integrate this workflow into your usual DevOps pipeline then it gets a bit more complicated as then the issue is IAM permissions which are opaque from my point of view.
Enough ranting.
Lambda functions
Oauth workflow can be easily split into 2 separate Lambda functions:
- Authorization
- Authorization callback
Authorization function
const { generateErrorObject } = require('./error')
const baseUrl = 'https://github.com'
const authorizePath = '/login/oauth/authorize'
const scope = 'user:email,read:org'
const allowSignup = 'false'
const authorizationUrl = `${baseUrl}${authorizePath}?client_id=${process.env.CLIENT_ID}&scope=${scope}&allow_signup=${allowSignup}`

exports.handler = async (event, context) => {

  if (!process.env.CLIENT_ID) {
    return generateErrorObject('CLIENT_ID is not set in environment')
  }

  return {
    statusCode: 302,
    headers: {
      Location: authorizationUrl
    },
    body: null
  }
}
Authorization callback function
const { generateErrorObject } = require('./error')
const https = require('https')
const { URL } = require('url')

function extractCode (event) {
  const queryStringParameters = event.queryStringParameters || {}
  return queryStringParameters.code
}

async function exchangeCodeForToken (code) {
  const api = new URL('/login/oauth/access_token', 'https://github.com')
  api.searchParams.set('client_id', process.env.CLIENT_ID)
  api.searchParams.set('client_secret', process.env.CLIENT_SECRET)
  api.searchParams.set('code', code)

  return asyncHttpsPostRequest(api)
}

async function asyncHttpsPostRequest (url) {
  return new Promise(function (resolve, reject) {
    https.request({
      method: 'POST',
      host: url.host,
      path: url.pathname + url.search,
      headers: {
        'Accept': 'application/json'
      }
    }, (resp) => {
      let data = ''
      resp.on('data', (chunk) => {
        data += chunk
      })
      resp.on('end', () => {
        try {
          let parsed = JSON.parse(data)
          resolve(parsed)
        } catch (e) {
          reject(data)
        }
      })
    }).on('error', reject)
      .end()
  })
}

exports.handler = async (event) => {

  if (!process.env.CLIENT_ID) {
    return generateErrorObject('CLIENT_ID is not set in environment')
  }

  if (!process.env.CLIENT_SECRET) {
    return generateErrorObject('CLIENT_SECRET is not set in environment')
  }

  if (!process.env.OAUTH_CALLBACK_URL) {
    return generateErrorObject('OAUTH_CALLBACK_URL is not set in environment')
  }

  const code = extractCode(event)

  if (!code) {
    return generateErrorObject('did not get expected query string named [code]')
  }

  let response
  try {
    response = await exchangeCodeForToken(code)
  } catch (e) {
    return generateErrorObject('Failed to exchange code for access_token')
  }

  if (!response || !response.access_token) {
    return generateErrorObject('did not receive expected [access_token]')
  }

  return {
    statusCode: 302,
    headers: {
      Location: process.env.OAUTH_CALLBACK_URL + '?access_token=' + response.access_token
    },
    body: null
  }
}
For reasons of brevity I have not included error.js file. But you will see all in a GitHub repository this code is living in.
Above functions could be added through AWS Lambda console which I initially did when playing with this issue, but it is much easier to have it locally and be able to run and test the code instead of learning which button does what in web UI.
Wrapping functions with SAM
Serverless application model (SAM) is a recommended way to deal with development of Lambda functions, it is a wrapper around CloudFormation (CF), so if you get lost or puzzled around SAM cli api then remember to check CF docs as well.
Wrapping above functions does not look hard by looking into the template:
AWSTemplateFormatVersion: '2010-09-09'
Transform: AWS::Serverless-2016-10-31
Description: >
  github-oauth

Globals:
  Function:
    Runtime: nodejs10.x
    Timeout: 3
  Api:
    EndpointConfiguration: EDGE

Parameters:
  GithubClientId:
    Type: String
    Description: Github issued OAuth client ID
  GithubClientSecret:
    Type: String
    NoEcho: true
    Description: Github issued OAuth client secret
  GithubOauthCallbackUrl:
    Type: String
    Description: Access token will be appended as parameter after which redirect will follow to this URL

Resources:
  OauthGithubAuthorizeFunction:
    Type: AWS::Serverless::Function
    Properties:
      CodeUri: oauth/
      Handler: githubAuthorization.handler
      Events:
        Gateway:
          Type: Api
          Properties:
            Path: /oauth/github/login
            Method: get
      Environment:
        Variables:
          CLIENT_ID: !Ref GithubClientId
  OauthGithubCallbackFunction:
    Type: AWS::Serverless::Function
    Properties:
      CodeUri: oauth/
      Handler: githubAuthorizationCallback.handler
      Events:
        Gateway:
          Type: Api
          Properties:
            Path: /oauth/github/login/callback
            Method: get
      Environment:
        Variables:
          CLIENT_ID: !Ref GithubClientId
          CLIENT_SECRET: !Ref GithubClientSecret
          OAUTH_CALLBACK_URL: !Ref GithubOauthCallbackUrl

Outputs:
  # here /Prod refers to implicitly created Prod stage
  ApiUrl:
    Value: !Sub "https://${ServerlessRestApi}.execute-api.${AWS::Region}.amazonaws.com/Prod/"
  OauthGithubAuthorizeFunction:
    Value: !GetAtt OauthGithubAuthorizeFunction.Arn
  OauthGithubCallbackFunction:
    Value: !GetAtt OauthGithubCallbackFunction.Arn
Unfortunately the devil is in the details and in order to get to this state in one go one has to run through many articles and pages of documentation despite the fact that this file was initially generated with sam init command.
Important bits
Globals.Api.EndpointConfiguration- make sure to set it correctly as this will reflect which certificate to use.EDGEwill require certificate issued inus-east-1.Parameters- a way to declare what parameters will be passed from CLI when deploying this stack.Parameters.GithubClientSecret.NoEcho- make sure to enable for sensitive information, otherwise it will be possible to see it withaws cloudformation describe-stacksResources.*.Properties.Environment.Variables- referenceParametersfor them to be accessible in execution environment.Outputs- additional parts which are visible when runningaws cloudformation describe-stacks
Further improvements
Above template does not deal with API “Stages” which is a feature of ApiGateway but rather creates one Prod automatically. Stages not only let you split API for test and production use cases but also allows to pass variables which are then available in event object upon execution. Stage variables seem to be a more transparent approach compared to environmental variables albeit its setup is not clear in SAM templates.
Useful documentation
- SAM spec: https://github.com/awslabs/serverless-application-model/blob/master/versions/2016-10-31.md
- SAM is CF, therefore Cloud Formation spec: https://docs.aws.amazon.com/AWSCloudFormation/latest/UserGuide/template-anatomy.html
- SAM Globals: https://github.com/awslabs/serverless-application-model/blob/master/docs/globals.rst
Devops
Setting up those functions is just part of the job as in an ideal world one should not be bothered with how this all gets deployed to AWS.
Further steps assume you have installed aws and sam CLIs.
Deployment from local environment
The easiest solution is to just record the necessary steps required to deploy application and write it down somewhere. After we can easily deploy by just following steps.
There has to be an S3 bucket
First lets create S3 bucket which will host packaged SAM:
$ aws s3 mb s3://my-oauth-app --profile awscredentialsprofile
Package application
Generate packaged.yaml and upload everything to S3 bucket.
sam package --output-template-file packaged.yaml --s3-bucket my-oauth-app --profile awscredentialsprofile
Deploy application
Finally deploy resources as a CloudFormation stack.
sam deploy --template-file packaged.yaml \
        --stack-name my-oauth-app-api \
        --capabilities CAPABILITY_IAM \
        --profile awscredentialsprofile \
        --parameter-overrides GithubClientId=XXXXXXX GithubClientSecret=YYYYYYY GithubOauthCallbackUrl=https://ZZZZZZZZ.com
Surely you can run these commands from your local machine but remembering GitHub client details and callback URL might leave you wasting some precious time. Another thing is remembering which IAM profile to use for deployments as I’ve shown with --profile awscredentialsprofile argument passed to each command.
Deployment from CI
It is easier to configure deployment on your CI server and then just run script on every commit to your master branch. This would obviously get more complicated if deployment is being done from other branches as well.
Deployment script
Lets take all those commands in previous section and wrap in a simple bash script.
#!/usr/bin/env bash -e

BUCKET_NAME="${LAMBDA_S3_BUCKET_NAME:?S3 bucket name required}"
CALLBACK="${GITHUB_OAUTH_CALLBACK_URL:?Callback url is required}"
CLIENT_ID="${GITHUB_CLIENT_ID:?Github client ID required}"
CLIENT_SECRET="${GITHUB_CLIENT_SECRET:?Github client secret required}"

if aws s3 ls s3://${BUCKET_NAME} 2>&1 | grep -q 'NoSuchBucket'; then
    aws s3 mb s3://${BUCKET_NAME}
fi

sam package --output-template-file packaged.yaml --s3-bucket ${BUCKET_NAME}

sam deploy --template-file packaged.yaml \
        --stack-name github-activity-server \
        --capabilities CAPABILITY_IAM \
        --parameter-overrides GithubClientId=${CLIENT_ID} GithubClientSecret=${CLIENT_SECRET} GithubOauthCallbackUrl=${CALLBACK}
Script will run in environment where AWS_ACCESS_KEY_ID and AWS_SECRET_ACCESS_KEY is available in the environment thus is not necessary to provide --profile argument.
Summary
Missing pieces
Although functions are deployed you still need to mess with ApiGateway custom domains to map certificate to above created Prod stage url, after which in one of the hosted zones of Route53 it will be possible to reference this api through CloudFront.
Another thing is setting up your website so it can deal with a callback from authorization callback function which will pass access_token as a query string parameter after redirect.
Thoughts
The whole experience was interesting to say at least. It is very different to what you’d do when writing code in say Spring Boot application, but the advantage here is that functions ought to scale infinitely and you should be charged only for usage. I cannot prove last point yet as there was no significant usage of my test application which uses this code app.gitactivity.com and I’m not using it long enough to tell you if I get charged when it is not used.
Writing YAML configuration was a horrendous experience, I’ve spent hours understanding how to write it having more than one api stage, and eventually ditched this idea, I’ll attempt that some time later again.
Maybe Serverless framework is better, but at the time of reading it did not support testing functions locally which SAM can do.
Suppose this configuration experience will be much better in the future when better SAM support in IDEs arrives.
Source code
This example was derived from the code I use in GitHub Dasmicrobot/github-activity-server